

Coachman's Cottage Clock
This step-by-step walk-through describes the stages to build a rustic kitchen clock from up-cycled pallet wood. My Customer specifed a 22 inch diameter, rough design and even supplied the outer ring paint to match the kitchen.
There's plenty of different techniques to make a clock - read on to see how we make ours..
(just click the individual pictures to see more detail)
How it's made

STAGE 1 - Wood selection and preparation
The raw material.
Satisfying to turn old wood into something new, especially if it was just going to be thrown away, But not the easiest stuff to work with. First the pallets are stripped and separated and the usable material is selected.
Loads of prep’ needed but old nails, holes, knots and splits give the finished product a charm and character of it’s own..
STAGE 2 - Customer Suggestions
The Customer's initial design. This is exactly what we need as a baseline. But if you have no idea at all we can still help to find something that suits.
So that’s the rough idea, size and colour sorted. The Customer even supplied the paint to match the same colour as the kitchen.


STAGE 3 - Initial Designs
Next, onto the computer to develop some initial designs.
The software we use is Silhouette Design Studio. It's the software we use for our Cameo vinyl cutter and it's pretty straightforward,
We like to offer a few different ideas with different fonts and layouts then it's over to the Customer to settle for a final design.
Or, if it's close we can tailor the design until it's right.
STAGE 4 - Workshop
Then off to the workshop, which doesn't have a great deal of space..
The boards are marked to a rough size and screwed together with cross plies on the back, carefully avoiding the cut line where the outer circle is positioned, Then the circle is cut out with a jigsaw.
The whole clock face and back is then sanded to make sure it's splinter free and has a good surface for painting.


STAGE 5 - Masking and Painting
The whole board is next treated with a dark oak stain and left to dry overnight.
The outer edge is then masked to give a contrasting frame and the centre circle stencil is cut on the Silhouette Cameo. This provides an accurate circle and really crisp lettering.
The maximum width for the Cameo is 300 mm so the circle for this one had to be cut with two semi-circles and joined in the centre.
STAGE 6 - First Stencil
With the centre stencil positioned and the outer 'frame' masked, the first coat of paint to the outer ring can be applied. As we're looking for the 'rustic/vintage' effect it doesn't really matter if the paint is not applied 'solid'. Some of the wood knots, old nail holes and cracks can be dry brushed over to give a really nice effect. It doesn't have to be perfect (which sounds a bit strange to those that know me well!)


STAGE 7 - Lettering
Here's a tip to ensure the letters are really crisp and sharp. I always apply a thin coat of clear PVA to the letters first. This seals the vinyl edges and is especially critical on reclaimed wood. The surface can be quite rough so this stage is a must. After the PVA is dry, apply the letter paint using a foam brush. I usually put an amount on the brush then dab it on the vinyl so that you don't apply too much at once. This helps ensure an even coat. Again, don't worry too much if the finish isn't perfect. All part of the finished effect.
STAGE 8 - The First Reveal
This is always a tough stage! I can't wait to remove the stencil after the first paint and my impatience has meant several retakes in the past..
Fortunately I managed it on this one and the letters look really sharp.
Next step is to position the numerals around the outside.


STAGE 9 - Numeral positioning
_edited.jpg)
This is where it gets a bit trickier. I've designed the numerals in Silhouette so that the size can be changed proportionally depending on the outside diameter of the clock. That's the easy bit.
The position of each numeral is marked using a home made laser cut template. It's lined up with the centre hole and each angle marked to get the exact position of each digit.
I've found this to be the easiest method. Large pieces of vinyl can be really difficult to position accurately and the language is not pretty when it goes wrong..
This works best for me.


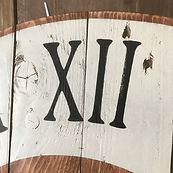
STAGE 10 - The Second Reveal
The numerals are stencilled in exactly the same way as the lettering, not forgetting the PVA of course. Left to dry and the stencil vinyl removed carefully, the clock is now looking like...... a clock!
Just a case now of opening up the centre hole to suit the mechanism spindle diameter and we're nearly there..


STAGE 11 - Top coating
Once the paint has thoroughly hardened and cured (at least 24 hours) a top coat can be applied.
But first I like to just rub over the painted parts with some 400 grit sandpaper, just to complete the distressed/antique effect. It really depends just what type of look you are after.
I always use an exterior water based acrylic clear coat - all over the front and back to really seal the wood and protect it properly. It's good to ensure the pallet wood is completely covered.
STAGE 12 - Fitting the Hands - the final touch
The battery operated mechanism is assembled in a chiseled recess at the back of the clock. The spindle is inserted into the centre hole and tightened to the board with a washer and nut.
And that's it - just the Copper Frog laser cut plate to fit on the backside and the clock is complete and ready for delivery.
As I said before - this is my method. It works well for me but if anybody has any suggestions for improvement - please let me know!


